![[DD] Boards & Chat](https://www.dailydiapers.com/board/uploads/monthly_2021_11/DDweb-02.png.0c06f38ea7c6e581d61ce22dffdea106.png)
 |
 |
Search the Community
Showing results for tags 'nursery'.
-
Hi everyone, This is my first attempts ever at writing a story of any kind, I hope you will enjoy it. It's the first chapter, I don't know how many it will contain or exactly where the story will go. I'm working on the next chapter, and I appreciate any feedback and constructive criticism. I have gone over it a couple of times, but might have missed some mistakes, English isn't my native language. Enjoy the read! ---------------------------------------------------------------------------------------------------------------------------------------------------------------------------------------------- The Mysterious Mansion Chapter 1: “Damn it!” the 26-year-old Sarah said to herself, after seeing her nice shoes getting stained from the mud. She didn’t expect the lawn she was walking on to be completely soaked and muddy, causing her shoes, which at first were beautiful and light pink, to now be dirty and mostly brown. Not that she had any right to complain, seeing as she was technically trespassing. The reason she was trekking through the grass in the first place was to make sure she stayed out of sight of any potential onlookers, while she walked up to the seemingly abandoned mansion. She knew she shouldn’t even be trying to reach the house, but she could no longer help herself. Every day she passed the beautiful house on her way to work and back, and every time she wondered if anyone was living there. She never saw anyone on the grounds or in the windows and there were never any cars parked. The yard seemed well maintained, though, and the front gates were locked every time she cheekily tried to open them. No longer being able to contain her curiosity, she had decided to walk around the perimeter of the grounds, following the huge hedge that loomed over her, which kept the mansion and the grounds obscured. After a brisk walk, she eventually found a tree close to the tall hedge, and after putting her long, blonde hair in a ponytail, decided to climb it. First, she got out her water bottle from her backpack and took a big gulp, trying to wash away the anxieties of what she was about to do. One of the lower branches hung above the hedge and looked sturdy enough to hold her weight, and, after a brief climb, she managed to reach it. Not pondering about it too long, she placed her feet on the thick branch, carefully testing it to see if her claim held true and it could support her full weight. A tiny voice in the back of her head warned her that this might not be a good idea, and when she looked down, she got slightly dizzy from the height. Just as she was deciding to climb back down, she heard a loud “crack” and she felt the branch she was standing on give way, taking her with it. She yelped and tried to jump back towards the tree, but she was too late, and the branch she was standing on, along with Sarah herself, broke free from the tree and fell towards the ground. Through sheer luck, her backpack got caught halfway down the hedge and left her dangling with her feet off the ground a good distance from the ground. After she recovered from the shock and looked down, she figured was stuck in the hedge with her backpack. Deciding she had no other choice but to abandon her cute, pink backpack she herself had embroidered with pretty flowers, she raised her arms and let herself slide out of her backpacks’ straps, towards the ground, and landing on both her feet. Looking up at her backpack hanging high up in the hedge, out of reach, she counted herself lucky she wasn’t injured. She felt a pang of sadness that she lost it, but decided that she could come back for it later. It hung safe out of sight from everyone outside the yard, and she reasoned that she could probably find something around the mansion to help her get it back when she was done exploring. Looking down at her light pink summer dress, she batted some leaves from it, seeing that her dress had survived the fall and was mostly undamaged, except for a small tear in her shoulder strap, but it did get a little dirty from the encounter. Checking her surroundings again, making sure that there was nobody around to spot her, she looked at the thick branch she took down with her and thought to herself how lucky she was, and that she probably shouldn’t be climbing any more trees, before letting her gaze fall upon the massive mansion, and venturing towards it. That is how she found herself lamenting her pretty shoes and she almost decided it wasn’t worth it, but her curiosity got the better of her and she kept walking. Her shoes were ruined now anyway. Now that she was getting close, she saw how beautiful, but old, the mansion was, it’s size looming over her even more than she could have imagined before. It seemed to be two stories high, built entirely out of large, beige bricks and with beautifully decorated windowsills. It looked old, but very well-maintained, without any visible damage or dirt. Whoever built this place, however long ago, must have been enormously rich, she thought to herself. She noted that the yard extended much further behind the building than the front, apparently being four or five times bigger than she expected, and counting herself lucky that she didn’t have to walk that far. She came upon the giant double doors that were the main entrance and was relieved to see that it was impossible to see her from the streets, and there wasn’t a single soul to be spotted in the windows either. She tried opening the doors, expecting them to be locked, but to her surprise, they opened easily. Pushing the left door open, the hinges creaked loudly, startling Sarah and causing her to jump back. She ducked and waited outside around the corner, scared of someone inside possibly having heard, but nothing seemed to happen. She waited a few moments more, but no one came to the front door, so she decided to take a quick peek inside. Entering the main hall, her mouth fell open in amazement. “Holy hell!” she accidentally exclaimed, forgetting she was trying to be sneaky. She slammed her hand to her mouth and hoped yet again no one had heard her. With her heartbeat racing, she looked around the large room, almost immediately forgetting that she wasn’t supposed to be here. She saw a main hall stretch on for a seemingly infinite distance, flanked by two staircases leading to next floor. The guard rails were decorated with marble and ornate shapes, looking like works of art belonging in a museum. Paintings taller than she was were hung on every wall, a chandelier with hundreds of precious stones glittered like the sun hung from the ceiling and she saw more doors than she was able to count down the hallway, upstairs and in the foyer. As she walked along the beautiful and thick red carpet, she noticed her shoes were tracking mud inside. Horrified, Sarah immediately took them off and threw them out the front door, on the steps leading up to it. The floor was a comfortable temperature for her feet, and she figured she wouldn’t need shoes inside anyway. It also had the added bonus of her footsteps being quiet as a cat with her socks on the thick carpet. She looked at the doors on either side of the room at the bottom of both staircases and decided to just have a quick look around, holding the believe there was no one inside to catch her sneaking around. She randomly decided on the door on her left, but when she was walking towards it, she felt a light breeze and heard a loud creaking echo around the spacious room. With a horrified expression, she looked back to see the front door slowly closing. She quickly sprinted towards it, but she was too late to stop it. It shut with a loud bang, just when she was able to grab the handle. In a slight panic, she pulled it with all her strength, but the door remained firmly shut. She looked for a way to unlock them but finding only a keyhole, with no key nearby. “What bad luck,” Sarah thought to herself, getting slightly anxious, “Very weird how it opened so easily before, but now is refusing to budge. Well, I guess I have to find another exit or a key now.” Slightly alarmed, but also a bit curious, she opened the door at the bottom of the stairs and walked through it. A long while later, Sarah had forgotten all about her fear of being discovered, sneaking around the foreign house. She was mostly just in awe at the size of every new room she found. Every room seemed much larger than it would have needed to be, and Sarah assumed that the owners must have very excessive taste. There was a kitchen, so large it could have twenty people working in it at the same time and would probably be able to serve ten times as many people. A dining room with a beautiful, ornate table which could fit everyone she knew. She found a library with hundreds of books, most in English, but some in exotic languages she couldn’t place, with a cozy reading nook. There were bathrooms, bedrooms, a tv room, storage room and even a room with a pool table. Most of the furniture was covered in a layer of dust, and everything looked like no one had been in there for years, but aside from that, everything seemed to be in pristine condition. What she didn’t find, however, and was starting to worry her just a small bit, was a door leading outside. The windows were not an option either, every single one was too high of the floor to reach or had thick, metal bars covering the outside. After losing count of how many rooms she had explored, and still seeing many doors she hadn’t tried yet, she happened to come upon the entrance hall again, mostly due to chance. The various hallways and huge rooms with multiple doors resulted in a very confusing building, making it very hard for Sarah to keep track of where she was. While she was in the foyer, she tried the front door again, but still no luck and she found her gaze exploring the stairway up, making her more and more curious what could be up there. Aware that she was even less likely to find an exit up there, she decided to and explore anyway. After walking through the seemingly endless corridors she found that many doors on this floor were locked, except for a few more bathrooms and a few bedrooms. She did notice, however, that it was starting to get dark outside, and Sarah thought she should go and find an exit soon. “Maybe there will be a fire escape?” she thought to herself, unsure if she believed herself at all. Deep inside she knew she was dying to see more of the beautiful mansion, and wanted to explore everything it had to offer. The next door she tried opened to reveal what seemed to be a large playroom, large even by the standards of this crazy huge house, filled with hundreds of toys, seemingly aimed a very young children or babies. Strangely, this room was completely clean, and no traces of dust could be found, unlike every other room she had discovered so far. Sarah entered the room and walked around in amazement. The first thing she came across was a row of dolls on standards, on a low shelf. The sizes of the dolls varied from 30 centimeters to some almost as tall as she was! They all had subtly different faces and different hair colors, but they all had kind expressions. “These must have cost a fortune!” Sarah mumbled to herself. They all had different outfits on too, ranging from nurses, teachers, yoga instructors and princesses, and they all seemed to have a mature, curvy shape, which caused Sarah to blush as she found herself staring. Quickly walking on, she found that the last doll in the line, one of the larger ones, strangely, and with the same proportions as the other ones, was dressed as a baby, including comically huge, thick, and pink diapers and an equally pink pacifier, covered in hearts, on a pink cord clipped to the light pink onesie it was wearing. She noticed that the onesie was the same shade of pink as the dress she was wearing, and when she compared it to the other dolls, she found that that particular doll was the only one with blonde hair, exactly the same color as her own. “What a coincidence!” She giggled to herself, walking on and not giving it much further thought. She would have loved to play with those when she was younger, she thought to herself, and secretly still a bit now. Sarah continued to explore the room. She found loads of different types of toys, that were, as most things in this house, much larger than she had seen them before. There was a rocking horse she could have fit on easily, and piles of stuffed animals, she even saw a few stuffed animals sitting against the wall which were bigger than she was, even in their current, sitting position! She couldn’t contain herself when she saw the largest stuffed animal was her favorite color. A giant pink bear with a large and friendly smile on its cute face, and a big heart on its belly. Despite Sarah knowing it wasn’t real, she felt it had a welcoming expression with its big, blue, comforting eyes. Even though she knew it was childish, she couldn’t stop herself, and jumped on his lap, folding her arms around it and giving it a big hug while burying her face in its soft fur. Despite Sarah being alone in a strangers’ house, cuddling with stuffed animals that didn’t belong to her, she felt completely safe, and she let herself totally relax. It even felt like the bear was hugging her back, but she knew that that was impossible, it was just a stuffed animal after all! When, after a long moment of hugging it with her eyes closed, she suddenly, felt the faintest of movements on her back, akin to something very large, very gently stroking her. She immediately opened her eyes and looked at her back, but she saw nothing except the arms of the bear on whose lap she was sitting, which were close to her, but not touching. She quickly got up, nervously looked around her and at the bear. Its expression remained exactly the same as before, but somehow looking at it now made her a bit uncomfortable, getting the eerie and weird sensation it could get up and grab her at any moment. She took a few steps backwards, but the bear remained exactly where it was, immobile. After staring at it for another while, she sighed, feeling like an idiot. “Of course the bear isn’t gonna move, it’s just a toy!” she said to herself, softly. Having calmed down a bit, she decided it would be best to leave this oversized playroom, thinking she should be heading home. When she entered the hallway, not being exactly sure from which way she came, she decided to check out one more room, just to satiate her curiosity. She picked a random direction to walk in and tried the first door she saw finding it, unfortunately, locked. She didn’t mind it much and walked on to try the next one, enjoying the feeling of the soft carpet on her feet. After trying a few doors that were locked, she came upon one that made her feel… weird. Sarah couldn’t exactly explain why, but she felt hesitant to open this particular door, even though it looked exactly the same as all the others, the hairs on the back of her neck standing upright as she approached it. She felt like she was just being a scaredy-cat and making a fuss out of nothing, so she soldiered on and grabbed the handle. It wasn’t locked, and opened easily, somehow almost disappointing Sarah. When she saw what was waiting behind the door, she loudly gasped. Before her was an explosion of pink, a room equally as big as the playroom she just visited, and almost everything was different shades of pink. It was obviously a nursery, Sarah thought, as it had a crib, changing table and other things you would need to take care of a baby. Just as the playroom, this room seemed spotless and very well-maintained and a sweet, almost homely smell seemed to hang in the air. Upon realizing that this room looked spotless and very much in use, Sarah quickly checked the crib again to make sure it wasn’t occupied, which, fortunately, it wasn’t. She slowly walked around the room, taking in the sights and being fascinated by the color palette. Everything was a shade of soft pink, and as she looked down at her dress she giggled and figured she would fit right in. What stood out to her as she approached the crib was just how big it was, it was easily the size of a double bed, and the bars were taller than she was. Fascinated, she continued to check the changing table, which was large enough for her to comfortably lie down on. “Just how tall are the owners of this house?” she wondered to herself. Like all the other rooms so far, this one seemed to be unnecessarily big, just as everything in it. She looked around the room and saw a large chest, a small cupboard with drawers, a large, mesh playpen that came up to her head with an open door, various pink cupboards, and a door. She got curious about the door and approached it, wondering what would lie beyond. When she opened it, she was amazed yet again, at the size of this room, which seemed to merely function as a wardrobe. She figured it was bigger than her living room! Uncountable pieces of clothing of all kinds were neatly hung on hangers, and a lot of it was very pink, and very frilly with many, many ruffles. She looked around in awe, thinking that it seemed to be perfect for a cute girl who would live in this nursery. She randomly grabbed an article of clothing, which turned out to be an adorable princess dress which any little girl would love to wear, bright pink with poofy shoulders and lots of glitter. Although strangely, when she held it up to her own body, it didn’t seem to be sized for a little girl, but it looked like it would perfectly fit herself, although the skirt of it was rather short. She shuddered and quickly hung it back, this dress would be too much even for her and her love of pink, and she left the closet without investigating any further. She was starting to get a bit freaked out by the scale of everything in this house and decided to leave this oversized nursery. She walked towards the door and looked back one last time, wondering who could possibly have lived here and how long ago, and having a strange affection for sheer amount of pink in this room. She grabbed the doorhandle and pulled. She almost walked face-first in the door when it refused to budge. Surprised, she tried pulling again, but the door refused any amount of movement yet again. Starting to get frustrated, she tried pushing, pulling and slamming on it with all her strength, but the door might as well have been a concrete wall for the lack of effect her efforts seemed to have on it. Starting to get desperate, she shouted for help, but no response seemed to come. Her breathing growing more and more panicked, she looked for a way out, but she only saw windows with bars on the outside, which were too high to reach anyway, and the door leading to the closet. After trying the door for what seemed like an eternity, Sarah came to the conclusion that she was well and truly stuck. “Well, fuck.” She dryly said. Worst of all, she started to feel the need to pee.
- 38 replies
-
- 10
-

-
 CHAPTER ONE “You have been such a bad girl, Bella. I think it’s time we try something different.” Bella followed her Mistress, practically skipping as they strolled through the woman’s luxurious home. Delightful tingles stretched from the tips of her toes through every inch of her nude body at the thought of what lay in store for her. Her Mistress was exceptionally creative and took great pride in her depraved work. Oh, the things they had done together. The unlikely pair turned down a hallway and stopped at the entrance of a room Bella had never seen before. “Mistress?” “Open the door. I know just how to tame this newfound bratty behavior of yours.” Bella loved this part. She lived for this part. There was such a thrill in putting absolute trust in someone and not knowing what came next. When the door opened, Bella expected another dungeon-type room, having spent many long hours in bondage as she was teased and tormented for her Mistress’ pleasure. Well…not only her Mistress’s pleasure. Bella stepped into the plush carpeting of the unfamiliar room and tried to take in what she was seeing. There was so much fucking pink. She wouldn’t call herself a tomboy, per se, but Bella had an edge and an intrinsic disdain for anything remotely dainty or girly. This new room was both of those things. And so much more. “Mistress, is that…” “Yes, Bella. You have been a naughty little thing for far too long, and it is time to try something better suited to your current behavior. I have a very special punishment in store for you.” “But, Mistress… I’m not into… I don’t really like…” “This is not about what your slutty little mind likes. Do you remember your safe word? Do you want to use it?” Bella hesitated... but ultimately trusted the older woman to know what she needed. “Bella?” She sighed. “No, Mistress. But I don’t like this. I don’t want to wear…” “I know, Bella. But I know you, inside and out. Your deepest desires are about relinquishing power and control to be completely at my mercy. That is all that this is. It just looks a little different from what you’re used to. Today, you are my doll to dress up and play with however I choose.” Bella wrestled with those words as she was escorted to the large table against the wall and climbed on top. Mistress reached below the table and reappeared with a handful of pink. Why did it have to be pink? Ugh. “Let’s start by making sure you stay out of trouble. These are for your hands. You won’t be able to do anything for yourself and will need me to take care of your every need.” Bella held up the padded mittens and quickly verified the truth of what she was told. She wasn’t getting out of these, and her hands were completely useless. Looking down, she saw Mistress fitting her feet with a similar pair. “These will make it harder for you to walk, and I love how cute the matching set looks, don’t you?” Mistress lifted Bella’s legs and attached her booties to two vertical posts that raised from the sides of the table and clicked firmly in place. A wave of vulnerability washed across Bella as her legs were spread wide, and her knees were bent to prepare her for the inevitability of what was coming. Her padded hands were next as one and then the other was raised to either side of her perturbed face and clicked into place. Bella performed the obligatory check of her bonds, and it was clear that she wasn’t going anywhere. She looked to her Mistress to see what came next. “Of course, we’ll need to do something about this hair…” Bella groaned. She wasn’t opposed to having her pubic hair removed. She had grown it, trimmed it, and even dyed it fun colors at the request of her Mistress. It wasn’t unusual for her to be completely bare, either, but she suddenly realized that there was a reason that Mistress had forbidden her to shave for the last several weeks. Mistress gives, and Mistress takes away. The shaving cream was cool and Mistress made fast work of removing the remaining vestiges of Bella’s womanhood until she was silky smooth. Bella felt a cool drizzle onto her shaven loins before Mistress rubbed the sweet-smelling oil into her skin. She moaned, despite herself, and stole a glance to see that Mistress was smiling. The teasing continued for a few moments before Mistress stopped and held up the one item Bella had been dreading most. “Mistress, I don’t want to do this anymore. Please. Anything else. Take me to the dungeon. Spank me. Put me on a leash. I’ll be your slave. Or your maid. Or anything else. Just…not that.” Mistress listened intently for Bella’s safe word before unfolding the pink diaper. She took her time and fluffed it menacingly, just like she had seen others do during her research. Mistress never jumped into anything haphazardly and was as prepared as ever for this new adventure. “Raise your bottom for me, Little Bella.” Bella stared up at the ceiling and tightened every muscle in her body. This might be happening to her, but she didn’t have to be a willing participant. A hard slap to her upturned bottom got Bella’s attention. But Mistress didn’t stop with one slap. Bella was far too experienced to be convinced by one little smack. Mistress covered every inch of her captive’s vulnerable bottom until it was a bright shade of red and Bella was crying and squealing and pleading for it to end. This wasn’t Bella’s first diaper position spanking, but it was certainly the most literal. Bella’s body was still tense as she felt her Mistress caress her face and tuck the matted hair behind her ears. She sighed and allowed her butt to ease down onto the soft padding as her Mistress continued to stroke her favorite sub’s hair and wipe away the tears. This was new. Mistress was as sadistic as they came and loved nothing more than to watch Bella squirm. But this was caring and nurturing and…weird. It was then that Bella noticed the gleam in Mistress’ eye and looked at her chest to see her deep, excited breaths. She was getting off on this! Bella studied the woman, peering deeply into her sage-green eyes. Those were not the eyes of a nurturing, compassionate caregiver. Bella saw someone deep into psychological mindfuckery and crafting new and ingenious ways to torment her. “There you go. That’s a good girl. I think it’s time to give you this before we wrap your cute little bottom in that big, thick diaper down there.” There it is. That’s the sadistic bitch that I know and love. The words and tone may sound sweet from the outside, but the humiliating undertone helped Bella clearly understand the game she was now playing. Mistress wasn’t into diapers and age play any more than she was. This was just another way to assert her dominance and watch Bella squirm. Game on. Bella was lost in these thoughts as the pink pacifier made its way into her mouth. She accepted it like the obedient slave she was and started sucking before she even realized what she was doing, so used to opening her mouth for gags or dildos or…anything else…that she unwittingly sucked anything that Mistress placed into her mouth without hesitation. Mistress booped Bella on the nose before letting her perfectly manicured fingernails trace their way down the girl’s squirming naked body. Bella lay her head down in an attempt to relax and make sense of all of this as she felt the soft baby powder rain down on her sensitive skin. As much as Bella hated this treatment, she couldn’t deny that she was getting turned on by it. But why? Bella was not into diapers or being cute or being nurtured. None of that ticked any boxes for her. She was always horny after a spanking, but this was more than that. She was tied down and completely vulnerable and exposed. That certainly helped. Bella wiggled her bottom on the exposed diaper and felt the softness against her smooth skin. Mistress lifted the front of the diaper and held it snugly against Bella’s powdered pussy as she pulled it back and forth to ensure a good fit. When Bella caught her eye, she noticed a mischievous look that hinted at Mistress likely trying to do more than just ensure a good fit. She heard the fierce rip of tapes and felt the thickness of the diaper between her legs as Bella was sealed into her fate. Staring at the ceiling, Bella continued to ponder what it was about this that was turning her on. As soon as her hands were freed, Bella tentatively reached down to feel the diaper through her padded mittens before she was promptly pulled off the table towards the chair in the middle of the room. With one swift motion, she found herself over her Mistress’ lap and staring at the carpet below her as the loud spanks of hand against plush padding echoed across the room. SMACK! SMACK! SMACK! It didn’t hurt, even after her recent spanking, but it may have been the most humiliating spanking that Bella had ever received. “Bad Baby Bella! That is your no-no place, and you are not to touch it when you are in diapers. You are far too little for that.” Bella was being spanked over an older woman’s lap in an adult-sized nursery while wearing a diaper and struggling to hold onto the pacifier that was forced in her mouth. And yet she still felt herself squirming and thrusting into her Mistress’ lap with every stroke. What the fuck is wrong with me? The spanking concluded and Bella was made to kneel between her Mistress’ legs, where she looked into the powerful woman’s deep green eyes and instantly felt at home. Despite the strangeness of what she was wearing and the odd surroundings, Bella felt more comfortable on her knees in front of her Mistress than anywhere else in the entire world. Was that it? Was it deep submission that was doing this to her? She raised her arms as instructed, thankful to have a shirt and hoping that there would be some pants to cover this stupid diaper. Bella was confused as Mistress reached between her legs and then realized that she was wearing a pink onesie. Of course I am. Bella’s eyes grew wide as she saw the hairbrush being pulled from under the chair. She had been a naughty schoolgirl on countless occasions and was well acquainted with the dreaded wooden paddle brush. But, for once, Bella didn’t sense any malice in her Mistress’ eyes. Bella was turned around to face the changing table where she had been desecrated as Mistress carefully brushed her hair. She let herself relax for a moment and looked at the restraints that held her in place as she was shaved and forced into her first diaper in decades. She let her view fall as she lowered her head and saw the storage under the adult-sized changing table. There were dozens of diapers, lotions, powders, and more. Bella’s eyes grew wide, and she almost dropped her pacifier. This wasn’t a one-time thing. Lost in her thoughts as she was, Bella didn’t even notice that her hair had been pulled into pigtails until Mistress was tying on the second pink ribbon. She was helped to her feet and led behind the chair to the crib. Bella hesitated but crawled in and laid on her back and wasn’t surprised to see restraints on all four corners. What did surprise the badass submissive was the adorable toddler staring back at her with bare legs poking out of a thickly padded pink onesie, high pigtails with perfect pink bows, and a pacifier behind wide, curious eyes. “That’s a nice touch, don’t you think?” A mirror over the crib. Bella eyed herself and looked at her Mistress: You cruel, beautiful bitch. “Domination isn’t all about whips and chains and things. It can also look like forcing you to be my pretty little doll, whether you like it or not. And we’re just getting started. It’s time for Little Bella to have a nap, and then we’ll have playtime. Mommy will see you soon.” Bella turned her head in surprise. Mommy? --------------------------------------------------------------- New chapter every Monday! OR You can read the rest of this story RIGHT NOW on my new Ream page, where you can read more of my stories, exclusives, and sign up for commissions.
.thumb.jpg.7ef6a01ac6efa2b78b4366e01bacfd54.jpg)
- 8 replies
-
- 6
-
-
- submissive
- submission
- (and 5 more)
-
As with my other articles, I have attached the PDF document with pictures to this article. Let me know if you have any questions Building an AB/DL Crib This is my AB/DL crib build. A few things I want to address before I go forward because I have gotten feedback on some of some of my other designs from individuals that do not seem to understand what my designs are intended to be… I have created a design the requires the bare minimum knowledge, skills, and tools and I am releasing all my designs completely free. If you have opinions of how to make it better or things you do not like about the design, then I suggest you design your own nursery furniture set and give it away to the community as I have. I have a full woodshop and space and can design something far more complicated with joinery, engravings, etc. But that is not the intention of my work or these designs. This is so any ABDL with $500 - $750 can build a crib of their own. So please understand that and be respectful. Now, with that out of the way, this crib features a swinging gate rather than the slide rail. Although there are several ways to accomplish a lift up gate design when I did my original research on the crib I looked into and talked to several other AB/DL that I knew have cribs and there were several struggles with it for all of them and although I know I could engineer a design that would work the cost and difficulty of the build would go up in that sort of implementation, which defeats the whole point of making this crib design simple and as uncomplicated as possible. I personally have built this crib in a twin size, double size and in a queen size. I have a friend that also built her crib entirely on my design off just pictures and my CapCon presentation, so this is very doable. The crib utilizes a steel curtain bedframe that costs on average $200 from amazon and is rated for 700 lbs. You will not need to modify the frame, so the integrity is 700 lbs., and the completed rails weigh less than 70 lbs. Another benefit of this crib design is that it is fourteen inches off the ground, which is perfectly suited for storing packs of diapers underneath the crib. I also personally used to underbed Rubbermaid tubs, one for loose diapers and the other is used for booster packs. Installed under glow LED lights both above and below the crib and I hung a TV inside the crib on the footer with a Nintendo switch hooked up as well. The lumber I used for this build was simple construction lumber from Home Depot. I own a planer and so I ran all the wood through the planer to keep the costs to a minimum, but friends who have built this design substituted lumber from alternative sources that was of nicer quality that did not require that step. All of that is not necessary, but they are options you could implement if you decide to build the crib. That being said… on to the build! Note: Although the bedframe advertises that a box spring is not needed to achieve the proper crib height, I highly recommend investing in a box spring. I thrifted for one myself. Parts List · Bed Frame file:///C:/Users/DarkS/AppData/Local/Temp/msohtmlclip1/01/clip_image004.jpg Amazon.com: ZINUS Patricia Black Metal Canopy Platform Bed Frame, Mattress Foundation with Steel Slat Support, No Box Spring Needed, Easy Assembly, Full : Everything Else · 52 x 1x2 8-foot pine strip (Rails and Gate) file:///C:/Users/DarkS/AppData/Local/Temp/msohtmlclip1/01/clip_image006.jpg · 12 x 1x4 8-foot pine strip corners and bottom base boards) file:///C:/Users/DarkS/AppData/Local/Temp/msohtmlclip1/01/clip_image008.jpg · 2 x 2x3 8-foot pine strip (Width top rails) file:///C:/Users/DarkS/AppData/Local/Temp/msohtmlclip1/01/clip_image010.jpg · 2 x 1x1 8-foot pine strip (Long Top rails) Hardware · 100 x 3/4 in wood working screws. · 100 x 1 in wood working screws. · 100 x 1 1/4 in wood working screws. · 12 x 3-inch corner brace (These are used to hold the crib rails to the bed frame) · Utility Pull handle (Gate handle) · 3 x 3 in narrow utility hinge (For gate) · Locking gate clasp (My crib is lockable but there are a variety of options to secure the gate closed) · 4 x 2 in corner brace (Used to strengthen the gate frame) file:///C:/Users/DarkS/AppData/Local/Temp/msohtmlclip1/01/clip_image012.jpgfile:///C:/Users/DarkS/AppData/Local/Temp/msohtmlclip1/01/clip_image014.jpg (Above samples of some of the hardware I used to build the crib. I did not use everything pictured but I did list everything that I used) Tools Required · Saw · Drill · Phillips head drive bit · 1/4-inch counter sunk bit (These are great for predrilling holes that will counter sink for the screws. · Measuring tape · Cloth measuring tape. · Several spring clamps in varying sizes (I purchased a lot at harbor fright Recommend at least eight of the largest size and 6 - 8 of the medium size. The more you have the easier some of this is) file:///C:/Users/DarkS/AppData/Local/Temp/msohtmlclip1/01/clip_image016.jpg For this build I cannot give direct measurements for cuts because I do not know what size crib you will being, and I did not keep records when I built two of the three cribs. But the build is very straight forward. (Important: You should pre-drill and countersink every single screw. Also, it is especially important to make sure you do not over drive or screw and make sure you select the appropriately sized screw, so it does not come out the other side. I believe on average the shorter screws work best on the lower rails and the longer screws work best on the upper rails, but that is something you will need to access and decide on as you are working. Step 1. Build the bed frame All your measurements will need to go off the bedframe, so the first step is to build the bedframe. I recommend not installing the mattress slats as it will make moving around in the crib easier. file:///C:/Users/DarkS/AppData/Local/Temp/msohtmlclip1/01/clip_image018.jpg Step 2. Building the top rails Cut the 2 2x3 boards so that they run the full length above the Header and footer of the frame. They need to be flushed against the metal so the rails can connect. Next measure the distance length wise between the header and footer and then cut the 2 1x1 boards so that the entire top of the crib has the four boards sitting atop of the upper rails. file:///C:/Users/DarkS/AppData/Local/Temp/msohtmlclip1/01/clip_image020.jpg Step 3. Cutting the Lower rails Using four of the 1x4 boards you need to cut lower boards for the header, footer and lengthwise. These boards should be inside of the corners and flush against the bottom rails. Use the medium clamps to secure them in place. (Note: The Header is shorter I placed the board on the second rail from the bottom as pictured below) file:///C:/Users/DarkS/AppData/Local/Temp/msohtmlclip1/01/clip_image022.jpgfile:///C:/Users/DarkS/AppData/Local/Temp/msohtmlclip1/01/clip_image024.jpg Step 4. Cutting and Enclosing the Crib frames Using eight of the 1x4 boards you need to measure from the top rail down to the bottom rails and cut the boards. Next, I suggest using clamps and doing one side at a time you are going to create a “Picture Frame” by screwing the side boards to the upper and lowers. Repeat this on all four sides. See pictures below for examples. (Note: See in the photo below of how the two corners meet. This is important to do the same) file:///C:/Users/DarkS/AppData/Local/Temp/msohtmlclip1/01/clip_image026.jpg file:///C:/Users/DarkS/AppData/Local/Temp/msohtmlclip1/01/clip_image028.jpgfile:///C:/Users/DarkS/AppData/Local/Temp/msohtmlclip1/01/clip_image030.jpg Step 5. The Rails Now the fun begins! First you need to decide where you want to place the gate. So, you need to know which side of the crib will be against a wall etc. and make sure the there will not be obstacles stopping the gate from swinging open. Once that is decided I recommend doing the Header, Footer and then the Lengthwise not gate side rails first. This process is repeated so it is not too technical. First, cut the rails so that they will extend the length from the top rail to the bottom. (Remember: The Header is shorter so do not cut all your rails to the header length) I personally hate math and did not try and figure out the perfect spacing to make them all exactly equal. What I did and recommend if you do not want to do that either is to find the exact center and your will start by placing one rail directly in the middle. Then using the cloth measuring tape you will measure four inches from the end of the middle and place a rail. Repeat that step until there is less than 8 inches from the end and place that final rail in the middle. Depending on the size of the crib you are building, that spacing will be roughly 3+ inches and is not very noticeable and will look like a feature. I am going off memory, but I believe the queen and Double crib sizes have the same number of rails on each side nine on the header and footer and thirteen on the non-gate side. The length side is the same process as the header and footer… just longer. file:///C:/Users/DarkS/AppData/Local/Temp/msohtmlclip1/01/clip_image032.jpgfile:///C:/Users/DarkS/AppData/Local/Temp/msohtmlclip1/01/clip_image034.jpgfile:///C:/Users/DarkS/AppData/Local/Temp/msohtmlclip1/01/clip_image036.jpgfile:///C:/Users/DarkS/AppData/Local/Temp/msohtmlclip1/01/clip_image038.jpg Step 6. Rails on the Gate Side As mentioned in Step 5 you need to know what side you want the crib gate to open. In this example the gate is on the left side and swings open to the right. This is something you will have to figure out for yourself but is not too complicated. How I started the gate side is exactly how I did all the other rail sides. I first found the middle and I installed a rail in that spot. I then installed rails on the non-opening side. file:///C:/Users/DarkS/AppData/Local/Temp/msohtmlclip1/01/clip_image040.jpg Step 7: Installing the Gate Hinge file:///C:/Users/DarkS/AppData/Local/Temp/msohtmlclip1/01/clip_image042.jpgTaking one of 1x2 rail pieces you need to place them perpendicular to the middle rail. This rail should be cut short so that it is under the top rail (Note: See in the image the example. Figure out where you want the three hinges to be. I personally cut and recessed my hinges. Some hinges do not need to be done this way, but I thought it looked better doing it that way.) Place your hinges and cut an Identical rail to match up to the opposite side of the hinge, but do not secure it. Step 8: Completing the Gate A way to make creating the gate easy is to first figure out the length of the upper and lower of the gate and cut those two pieces. Then using the clamps and measuring tape, measure out four inches and secure the first rail of the gate, then the second, third etc. This will give the gate rigidity for you to use the four corner braces to finish off the gate. Using a scrap piece of rail place the piece at the end on top of the 1x4 corner piece so that the gate can rest flush. On this piece install your gate lock or latch. Install the gate handle at the end of the gate. file:///C:/Users/DarkS/AppData/Local/Temp/msohtmlclip1/01/clip_image044.jpgfile:///C:/Users/DarkS/AppData/Local/Temp/msohtmlclip1/01/clip_image046.jpg file:///C:/Users/DarkS/AppData/Local/Temp/msohtmlclip1/01/clip_image048.jpgfile:///C:/Users/DarkS/AppData/Local/Temp/msohtmlclip1/01/clip_image050.jpg file:///C:/Users/DarkS/AppData/Local/Temp/msohtmlclip1/01/clip_image052.jpg Step 9: Stain or Paint At this point you should have four completed crib sides. Take each side off, sand, prime or prep, and either paint or stain the rails as to the look you prefer. I personally think stain is easier and looks nicer, but I have friends that painted their cribs as well. (Note: If you do decide to stain make sure you add a protective coat of Polyurethane or some other finish) Step 10: Final installation file:///C:/Users/DarkS/AppData/Local/Temp/msohtmlclip1/01/clip_image054.jpgI recommend putting the box spring and mattress on the bed frame before you even begin to put on the rails for the last time, but you can technically wait until putting on one lengthwise rail. Once you have all four rails on you are going to use the twelve 4-inch corner braces. I just eyeballed their placement, but there will be three on each corner. One at the top, middle, and bottom. These braces will effectively hold the four sides in place and the top bars, thanks to gravity, will keep everything secure. I hope you found these crib building instructions helpful and straightforward. Below are several other examples of buildings by me and my friends. If you have any questions, please message me on my socials or through my email at babyleprechauncreations@gmail.com file:///C:/Users/DarkS/AppData/Local/Temp/msohtmlclip1/01/clip_image056.jpg file:///C:/Users/DarkS/AppData/Local/Temp/msohtmlclip1/01/clip_image058.jpgfile:///C:/Users/DarkS/AppData/Local/Temp/msohtmlclip1/01/clip_image060.jpgfile:///C:/Users/DarkS/AppData/Local/Temp/msohtmlclip1/01/clip_image062.jpg Building an ABDL Crib.pdf
-
Before reading this... yes, I'm aware the images aren't there. I attached a PDF that contains them. Also... unlike many of my builds for the changing table there are better options in my opinion that would not require DIY modifications. I have added one such model as an example at the end of the article. I hope this helps! Baby Jp Building an AB/DL Changing Table file:///C:/Users/DarkS/AppData/Local/Temp/msohtmlclip1/01/clip_image002.jpg Recommendation: Although this build worked out for me, I would not repeat this build and would not recommend it unless you already had one of these massage tables and wanted to convert it into a changing table. There are several options on amazon that are the same product, and the cost of the table is the same it all the labor materials and time it would take to build this table. Parts List · Massage Table file:///C:/Users/DarkS/AppData/Local/Temp/msohtmlclip1/01/clip_image004.png Amazon.com: BestMassage Massage Table Portable Massage Bed Lash Bed 2 Fold SPA Table 24 inch Wide Adjustable Salon Bed with Non-Woven Bag for Spa Footmassage Facial CareSpa Tattoo : Beauty & Personal Care · 2 x 8’ 4x4 Pine lumber · 1x1 inch popular square dowel · 2 x 1/4-inch-thick sheets of MDF · 4 x Cube storage containers file:///C:/Users/DarkS/AppData/Local/Temp/msohtmlclip1/01/clip_image006.jpg Amazon.com - DECOMOMO Storage Baskets, 13x15x13 Storage Cube Bins with Labels for Organizing Shelves Kallax (Kallax / 4pcs, Black) · 4 x 2” x 8’ Pine boards · Pack of one inch carpentry screws Tools Required · Router with a 1/4 inch cutting bit. · Drill · Basic hand tools (To disassemble the Table) · Saw Starting off, this build can be completed without any DIY or modifications depending on what massage table you select to be your starting project. I produced this build concept after attending CapCon for the first time and saw that all the changing rooms had a foldable massage table to be used as a changing table. It was such a brilliant idea for me that I decided to buy one as we were driving home. That being said… if I were to do it all over again, I would not have gotten the table that I purchased. I am incredibly happy with it now after the modifications I made, but I had purchased the cheapest table available on Amazon. It had skinny wooden adjustable legs and never felt very solid unlike the ones at CapCon. file:///C:/Users/DarkS/AppData/Local/Temp/msohtmlclip1/01/clip_image008.jpgfile:///C:/Users/DarkS/AppData/Local/Temp/msohtmlclip1/01/clip_image010.jpg Improving the table was easy enough. I removed the original legs by unscrewing the single screw that secured each leg and then I cut six 4x4 pine posts to my desired leg height. I then marked where the 1x1 inch legs had been on each of the posts and then using a router I removed a two inch long by 1 inch channel in each post so that it would match up with the leg slots. I then glued in the one-inch dowel rod. file:///C:/Users/DarkS/AppData/Local/Temp/msohtmlclip1/01/clip_image012.jpgfile:///C:/Users/DarkS/AppData/Local/Temp/msohtmlclip1/01/clip_image014.jpg To add an under shelf and to add more stability to the legs I cut a 1/4-inch groove using the router in each of the posts on the left and right and two on the two middle posts so that I could slide two MDF sheets between them to act as shelves. file:///C:/Users/DarkS/AppData/Local/Temp/msohtmlclip1/01/clip_image016.jpg Lastly, I added a strip of the 2-inch boards, one at the point of the shelf and the second at the top just below the tabletop. file:///C:/Users/DarkS/AppData/Local/Temp/msohtmlclip1/01/clip_image018.jpgfile:///C:/Users/DarkS/AppData/Local/Temp/msohtmlclip1/01/clip_image020.jpg My recommendation to someone looking to have a changing table of their own is to purchase a better quality and designed massage table. You could potentially find a rock-solid table and just put shelves underneath it or even simply slide a shelving unit under the table rather than having to build it. file:///C:/Users/DarkS/AppData/Local/Temp/msohtmlclip1/01/clip_image022.jpg Amazon.com: PayLessHere Massage Table Lash Bed 2 Fold Spa Bed 74”Lx28“W PU Leather Massage Bed Height Adjustable Massage Bed Heavy Duty Stationary Spa Table Salon Facial Cradle Bed : Beauty & Personal Care Building an ABDL Changing Table.pdf
-
I doubt my pictures will show up with the instructions, so I've included a PDF as well that has all of the images. Let me know your thoughts or if this helps. I will be posting the changing table and crib builds very soon so follow for updates! file:///C:/Users/DarkS/AppData/Local/Temp/msohtmlclip1/01/clip_image002.jpg Before Purchasing Anything Please look over this whole build! There are several options, upgrades, and ways to build this highchair. This is my third iteration of building an AB/DL highchair and with the first one I just used a wheelchair tray and a highbacked bar chair. With the third build I had added anchor points, a custom tray that uses genuine highchair tray hardware, as well as an upholstered seat and back. I also added a harness to secure squirming babies and anchor points for more kinkier scenes. Parts List · High top bar or deck chair with arm rests file:///C:/Users/DarkS/AppData/Local/Temp/msohtmlclip1/01/clip_image004.jpg Amazon.com: POLYWOOD® Traditional Garden Bar Chair, Black · Wheelchair Tray file:///C:/Users/DarkS/AppData/Local/Temp/msohtmlclip1/01/clip_image006.jpg Amazon.com: AlveyTech Wheelchair Tray Table with Cup Holder - Universal Removable Lap Desk - Ideal for Adults Eating Reading Resting - Compatible with Drive, Golden, Electric, 18-20inch Wide Standard Wheelchairs : Health & Household (Optional) · Go Kart Harness file:///C:/Users/DarkS/AppData/Local/Temp/msohtmlclip1/01/clip_image008.jpg Amazon.com: Yakitoko Universal 4 point Safety Harness Set 2" Fits Go Kart,UTV,ATV,Racing Blue : Automotive · 2 x Sheets of MDF 3/4” thick (cut in the Dims of Chair back and seat · Cloth or material cover for seats · 2 x Sheets 2” upholstery padding (For seat and back) · 2 x ½ thick hex bolt screws (For harness standard bolts that come with will not work) · Anchor Points file:///C:/Users/DarkS/AppData/Local/Temp/msohtmlclip1/01/clip_image010.jpg Amazon.com: D Ring Tie Down Anchor 1/4" Heavy Duty Trailer Anchor Lashing Rings 2400 lbs Capacity Trailers Trucks Bed Anchors Bracket Hooks Kit for SUV,RV,Camper,Van,Car,Boats, Motorcycles Surface Mount (Black) : Automotive · MDF 3/4” thick 16” x 25” sheet · 4 x 1.5 in 32” Pine stripes · Highchair hardware file:///C:/Users/DarkS/AppData/Local/Temp/msohtmlclip1/01/clip_image012.jpg Amazon.com: High Chair Tray Hardware, baby toddler kid child seat stool antique vintage old retro : Baby · Various lengths woodworking screws Tools Required · Basic power Drill · Staple gun with 1/2" staples · Paint or Clearcoat · Hand Jigsaw · Router This can be the easiest build or a complex one depending on what you are wanting to create. You can also always upgrade the chair as you go. Basic build For the basic build you only need two components. A high-backed bar or deck chair that has arms and a wheelchair tray. This build requires no tools at all. Simply use the Velcro straps on the wheelchair tray on the arm rests of the chair. file:///C:/Users/DarkS/AppData/Local/Temp/msohtmlclip1/01/clip_image014.jpg Adding Anchor Points & Harness Using the anchor points and the go kart harness listed and linked in the parts list you can add a harness and anchor points that can be used to secure an ab/dl in their seat. I placed six total anchor points on the chair (Pictured below) file:///C:/Users/DarkS/AppData/Local/Temp/msohtmlclip1/01/clip_image016.jpgfile:///C:/Users/DarkS/AppData/Local/Temp/msohtmlclip1/01/clip_image018.jpgfile:///C:/Users/DarkS/AppData/Local/Temp/msohtmlclip1/01/clip_image020.jpg The first set are at either side of the footrest. The second set is just below the front arm rest and the last set is at the back of the chair just by the seat. To install the harness, you will need to pre-drill the hole roughly three inches, six inches apart from the middle back post of the chair. I recommend taking one of the bolts supplied with the harness to a hardware store to find a drivable screw that will fit the harness. (Make sure it is not going to go through the seat back. file:///C:/Users/DarkS/AppData/Local/Temp/msohtmlclip1/01/clip_image022.jpg Building an Upholstered Chair Back and Seat To upholster the chair, first, I highly recommend watching a couple of videos on YouTube. The process is very do-able and easy but watching someone do it first will make it far easier. To start you are going to need to have a piece of MDF cut to fit the chair back as well as the seat. You will also need upholstery foam, a staple gun and fabric. For mine I chose an outer cover (Space themed cloth and a back cover (Solid Blue) To upholster the seat and back, place the fabric that will cover the seat. (Outer side down first) then the upholstery pad then the MDF on top. Recommendation: Have several extra inches of spare material. You will be covering it with the back cover later. I personally found it helpful to kneel on the MDF board. Compressing the padding with the weight as you staple the material to the board will help remove creases and will keep the material tight. Secure one side at a time. Once all four sides are stapled you can cut excess material and then add a back cover material to clean up your work. Then use screws to secure the cushions to the chair. file:///C:/Users/DarkS/AppData/Local/Temp/msohtmlclip1/01/clip_image024.jpgfile:///C:/Users/DarkS/AppData/Local/Temp/msohtmlclip1/01/clip_image026.jpgfile:///C:/Users/DarkS/AppData/Local/Temp/msohtmlclip1/01/clip_image028.jpg Building a Custom Highchair Tray To start, you will need to secure a piece of wood to the armrests with screws. This will add height so that your legs will not hit the tray if you add cushions and additionally it will give you a place to mount the hardware. (See below) file:///C:/Users/DarkS/AppData/Local/Temp/msohtmlclip1/01/clip_image030.jpg To build a custom highchair tray you will need to cut a tray either from a plywood sheet or you can use a piece of plywood or MDF cut into a 16” x 25” sheet and add runners with screws to make the tray. Both examples are shown below. Note: I cannot give exact measurements of where to put the hardware and runners because you will need to line everything up. I suggest using clamps and marking things with a pencil as you figure out how everything lines up. file:///C:/Users/DarkS/AppData/Local/Temp/msohtmlclip1/01/clip_image032.jpgfile:///C:/Users/DarkS/AppData/Local/Temp/msohtmlclip1/01/clip_image034.jpg Lastly, you MUST seal the tray with a clear coat, polyurethane, or some other product otherwise it could seriously warp or absorb any liquid. file:///C:/Users/DarkS/AppData/Local/Temp/msohtmlclip1/01/clip_image036.jpg Best of Luck Babies! Building an ABDL Highchair.pdf
-

From the album: My Just for Fans Samples
© Baby Jp
-

From the album: My Just for Fans Samples
© Baby Jp
-

From the album: My Just for Fans Samples
© Baby Jp
-

From the album: My Just for Fans Samples
© Baby Jp
-

From the album: My Just for Fans Samples
© Baby Jp
-

From the album: My Just for Fans Samples
© Baby Jp
-

From the album: My Just for Fans Samples
© Baby Jp
-

From the album: My Just for Fans Samples
© Baby Jp
-

From the album: My Just for Fans Samples
© Baby Jp
-

From the album: My Just for Fans Samples
© Baby Jp
-

From the album: My Just for Fans Samples
© Baby Jp
-

From the album: My Just for Fans Samples
© Baby Jp
-

From the album: My Just for Fans Samples
© Baby Jp
-

From the album: My Just for Fans Samples
© Baby Jp
-

From the album: My Just for Fans Samples
© Baby Jp
-

From the album: My Just for Fans Samples
© Baby Jp
-
Designing and Decorating your AB/DL Nursery You’ve decided to take the exciting leap that all Littles dream about, and you want to build a nursey of your own. As someone who has done just that I decided to write this suggestive guide to help give you some ideas and learn from my mistakes and benefit from my successes. Before getting started, I suggest picking a central theme. The theme should be something that is close to YOU and makes YOU happy. That being said, I highly recommend writing down a few themes to brainstorm. After you have a few ideas, I suggest doing a google hunt for products and items that would be a wish list of items to realize the theme. Aside from the ABDL furniture, you need to think about paint, lighting, flooring, wall hangings/decorations, and things like storage. For this run through, I’m going to use my nursery as an example. I’ll cover each aspect of the design and what I ended up doing. My Theme For my nursery I chose “Space/Rockets” as my nursery theme. I knew from repeated google searches there was a ton of products both baby and adult that made the theme ideal. One method you may want to try in testing/deciding on your theme is can you find a bedding/comforter set for your theme. Walls For my personal nursery, I decided not to paint the walls of my nursery. My house is over one hundred years old, and I like the unique/original woodwork and the neutral eggshell color, but that didn’t hinder me from decorating the walls. I started off with several wall hangings: a NASA flag, a massive technicolored tapestry of an astronaut floating in space, a tapestry of the solar system and a final hanging of the ABCs that was space themed. On the practical side of wall hangings I installed some small space themed shelves above my changing table that contains my wipes, powder, lotion etc.… easily within reach of a changer but more importantly I can easily reach them as well when I’m on the table so it helps when I’m changing myself. I suggest looking for corner shelves, stuffie hanging hammocks and other little things that can help tie the room together. Remember, this is your room and a safe space, so your opinion is all that matters. The last piece I highly recommend is a fun and cheap little project that you can do and that is making and hanging your name, ABDL, BABY, or some other cute phrase in large letters. You can get large letter blanks at any hobby or craft store or even Walmart. Floors Carpets are ideal for a nursery/play space. If you are anything like me who loves their tummy time, carpets are necessary, but you can also get things like playmats and also large foam puzzle pieces to your floor. I have two playmats in my nursery. One by my changing table and the second larger one is in my main play space that also doubles as an ABDL Baby Gym. Like I mentioned in picking a theme, I found several space themed playmats in my brainstorming google search and bookmarked them when I got to the phase of the nursery build. I personally try to keep most of my floor play space clear when I am not playing, but a large corner stuffie or Stuffie pile, bean bag chair or one or two large toys that can occupy a corner out of the way that won’t present a tripping hazard are also great for the nursery space. My advice is to try and find the happy medium between cluttered and spartan. The nursery floor should look welcoming and an inviting place an ABDL would want to lay down or sit to play with easy crawl access to nearby stimuli. Ceiling This is an area that many overlook, but I highly recommend not neglecting this aspect of your nursery. Ceiling decorations and hanging stimuli such as a mobile, baby gym, glow-in-the-dark stars are many common stimuli found in nurseries. What I did for my nursery was a number of things that kept with my space theme. The first was I replaced the ever common “salad bowl” light for a large LED “Moon” light that was remote controlled and featured various lighting settings. I’ll discuss that item more in the lighting section, but changing the light to a moon dramatically changes the space when laying on your back and staring at the ceiling. The second aspect I added for the ceiling was I purchased a laser star/nebula generator. These nail the space theme for me, but I recommend looking into light show generators for your nurseries as they are cheap, often remote controlled, and require no installation or room modification. The third ceiling modification I recommend is ceiling hangings. This is an easy way of adding more stimuli but does require minor room modification. What I did for my nursery is I built several Nasa Lego sets, such as the Space Shuttle, ISS, and the Hubble telescope, then using strong monofilament fishing line and a few small eyelet screws, I secured the models to the ceiling upside down and a various angles to imitate them floating in space. These three additions have made lying in the crib or on the nursery floor a stimulating and wonderful experience no matter where I look. The hangings don’t have to make sense like an imitation of space… You could fill the ceiling with floating squish mellows, dinosaurs, barbies, flying superheroes… let your baby imaginations run wild. Hanging a mobile from the ceiling, adding designer light or even ceiling stickers are also a possibility. My childhood room my parents painted the ceiling to look like a sky with clouds and the ceiling fan had images of fighter jets on the blades. Be Creative! Be You! Lighting As mentioned in the ceiling section there are several creative main room lighting options available. The main room light fixture can be an expensive option but really can really help you mentally make that leap from a room to a nursery. The standard salad bowl or “Boob” light just doesn’t have the same feeling as a colorful lighting option. Some suggestions when making a lighting selection: Look for an LED option that is adjustable. Many lighting options today can change colors, intensity, and are dimmable. Another suggestion is to look for something that is remote-controlled. The “Moon” lighting that I installed in my nursery has a remote option and I can’t tell you how nice it is to be in the crib and be able to adjust the lights to my liking. If buying and installing a new light fixture isn’t a possibility… no need to build a blanket fort to cry in… do build a blanket fort though… A creative option for lighting a nursery and also adding more fun elements is to get a basic smart home device and some smart lightbulbs. Many smart bulb options offer color changes, dimmability, and can be controlled through a phone app. You can also link smart bulbs with a smart home device to add a voice control option to your lighting. Other creative lighting options to think about are things like: An end table Lamp, night light, LED strips, and wall or ceiling light projectors. There are tons of themed options for each of these lighting options. One option I want to touch on is the LED lighting strips. Creative installation of LED lighting can really make your nursery unique and a wonderful place. I placed LED lights along both the top rail and underside of my crib and also on the underside of all of the shelves of my changing table and diaper storage. The lighting not only adds mood to the room, but it also is a functional improvement as it lights all my diaper storage. Storage Having a place to store toys, packs of diapers, clothing, changing supplies, and other play gear is a must have for any nursery space. It also can offer tabletop space for various décor items like a night light, lamp, stuffies, toys or even offer more storage. When I was looking at storage for my nursery, I first accessed the majority of my toys so I could have a better idea of what my needs were so I could get the ideal toy storage. I have a lot of blocks, toy RC construction toys, wooden train sets along with some hand puppets and large wooden playsets. I want something that would both display some toys but also could hold all the blocks and smaller toys that had lots of pieces. I found the perfect large toy box/shelf combo on Amazon. https://www.amazon.com/gp/product/B0DJM552C2/ref=ppx_yo_dt_b_search_asin_title?ie=UTF8&psc=1 My advice when selecting something is get the dimensions of the furniture piece and make sure that not only does it fit in the space in the room, but that it also can fit the toys that you want to place. All dimensions should be listed on websites. Other storage ideas can be under your bed/crib… most bed frames are fourteen inches off the ground which is the standard height of a diaper pack. Something else I have done is I purchased two large Rubbermaid containers designed to go under the bed. I can place loose diapers and boosters inside for storage. Small hanging shelves by the changing area are great for diaper changing supplies and a stuffie hammock are great for babies with a lot of little stuffed friends. Amazon and Ikea are really solid places to look for storage options if you are looking for something in particular. Thrift stores are another great budget option that offers great DIY potential. Toys What AB doesn’t love their toys? Well, toys can be used in more ways than just playing. Some ideas to try: Stuffies strategically stationed in special areas of the room to protect you, wooden alphabet blocks spelling out fun phrases, Toys hanging from the ceiling, completed Lego models, maybe a wall full of Funko pops, action figures, my little pony, troll dolls, barbies, squishmellows… Your nursery, your imagination, your dream manifest! Make it happen!!! Furniture AB/DL nursery furniture like a crib, changing table, baby gym, play pen, rocking, and highchair are what a lot of folks may dream of having. I can tell you they are all possible, and I plan on writing articles on every single one of my DIY build ones for each. I will include the links to the base items I used for those builds in the meanwhile if you want to try to design your own. More to come on those article, but I suggest if you plan on one day adding these elements to your nursery to account for them if you are making a nursery space. Crib For a crib I recommend a canopy steel bed frame. The rails offer great support for rails and the bed frame is absolutely solid and you will avoid some of the issues when you try to convert a standard bed frame into a crib for my crib. Link: Amazon.com: ZINUS Patricia Black Metal Canopy Platform Bed Frame, Mattress Foundation with Steel Slat Support, No Box Spring Needed, Easy Assembly, Full : Everything Else The frame is under $200 and comes in single, full and queen. I have built cribs in all three sizes, but my personal crib is full. I built the wooden rails four inches apart with a swinging gate. A box spring and mattress will place the crib bed at the perfect height. Changing table A changing table is something I use every day, and it was actually one of the easiest additions to my nursery thanks to inspiration I got at CapCon. I purchased a massage table which was available as changing tables at the Age player’s Convention. I have included the link to the one I used but I wouldn’t recommend it if you aren’t planning to rebuild the table. It is a good table, but since it is a travel table for around $100 it isn’t the most solid unless it is rebuilt. I took the original legs off the table and built new legs with a shelf out of six 4x4s and some plywood. Amazon.com: BestMassage Massage Table Portable Massage Bed Lash Bed 2 Fold SPA Table 24 inch Wide Adjustable Salon Bed with Non-Woven Bag for Spa Footmassage Facial CareSpa Tattoo,Black : Beauty & Personal Care Highchair Right up front I will say that my highchair build was pretty expensive, but that is because it is not the first time, I have built a highchair and there were serious issues with stability, and I want to create builds that others can replicate. For this build, I purchased a garden bar chair from amazon. Amazon.com: POLYWOOD® Traditional Garden Bar Chair, Black The cost was $350. I then cut a tray from a sheet of MDF. The tray clips on to the chair with genuine highchair clip hardware from amazon. Amazon.com: Highchair Tray Hardware, baby toddler kid child seat stool antique vintage old retro : Baby I also added a go kart harness for baby’s safety. Amazon.com: Yakitoko Universal 4 point Safety Harness Set 2" Fits Go Kart,UTV,ATV,Racing Blue : Automotive and I used seat cushion foam, fabric, and a staple gun to add some padded upholstery. The last two things weren’t really necessary, but the fabric was space themed to tie into my nursery and it was a challenge I thought I could accomplish. Baby Gym The Baby gym build was entirely from scratch, but I have already written that build article so I will include the link to my article below: Building an AB/DL Baby Gym - Product Reviews and Info - [DD] Boards & Chat Happy Padded Life to All – J.p. Designing and Decorating your AB Nursery article.pdf
-
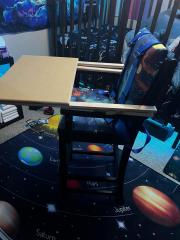
From the album: My ABDL Nursery
© Baby Jp
-
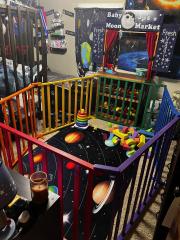
From the album: My ABDL Nursery
© Baby Jp
-
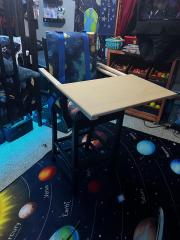
From the album: My ABDL Nursery
© Baby Jp

.jpg.cd98d833bfb4d96decfb20aadd18adcf.jpg)